


HP 934, 935 Ink-Series Printer Models
Degraded Image Quality or Missing Colors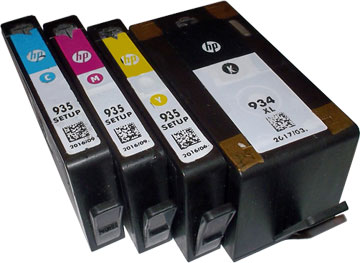
Many of the HP printer models which use HP 934, 935 ink cartridges may experience poor image quality and/or ‘color cross-contamination’ at some point during the printer’s life, but if you recently refilled your ink cartridges and observe substandard image quality please adhere to recovery suggestions below:
TECH TIP: Always cap empty ink cartridge(s) with orange storage clip/cap to ensure internal foam does not dry out. Cartridges brought in for refilling with dry foam may need to sit upright (as shown below) for up to 48 hours to allow the internal foam to completely reabsorb new ink following ink refilling. Capping the cartridge will ensure foam stays ‘damp’.

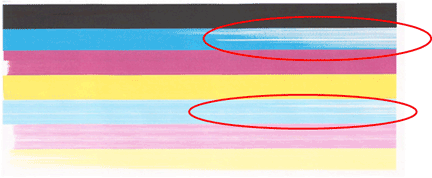
NOTE: If you cannot identify which color cartridge is empty, print a test/diagnostic page via: 1) your printer control panel or 2) via the ‘Test Prints’ button below. A faded/missing color indicates empty. In the examples below, streaking/banding can be observed – running the ‘Clean Printhead’ can help remedy these issues.

1) Perform Printhead Cleaning
It is suggested to first initiate the ‘Clean Printhead’ feature (under the TOOLS/MAINTENANCE menu) to ensure air is not trapped in the newly refilled ink cartridge or printhead. The ‘Clean Printhead’ feature can also help clear a clogged printhead.

2) Allow 24-48 hours for foam to fully absorb ink
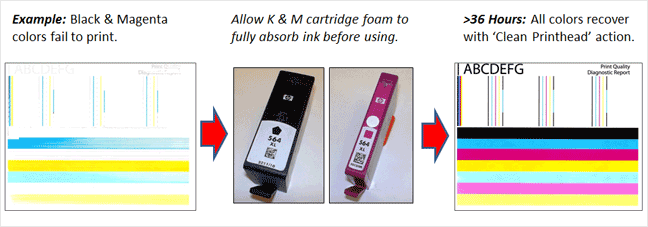
a. If, following several attempted ‘Clean Printhead’ actions, select colors do not recover, then allow the newly refilled cartridge sit upright and idle in the printer (or with storage caps installed if cartridges are not yet installed), for at least 36 hours (i.e. do not use printer during this time). Quite often HP564 ink cartridges which have been allowed to dry out (or select colors were allowed to run completely empty during normal printing usage) will be problematic immediately following ink refilling – you will need to allow cartridge foam (ink port at base of suspect ink cartridge) to fully absorb the ink – unfortunately this typically takes 24 – 48 hours, on average.
b. For refilled HP 934, 934XL, 935 & 935XL cartridges which are not in use, ensure the orange protective cap is securely attached to bottom of cartridge (covers ink spout) to prevent cartridge from drying out. CAUTION: If the internal foam is allowed to dry out then cartridge recovery may be difficult and possibly unusable. While it is normally suggested to use tank-based cartridges 1 year from the refill date, it is recommended to use refilled HP 934 & 935 ink cartridges within 90 days to avoid print quality issues due to the type of foam inside the cartridge. 
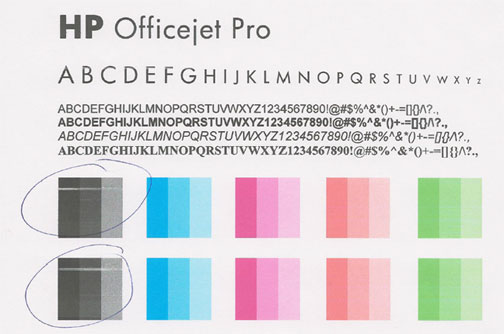
c. To verify all colors are firing properly, print a Self Test page or Print Quality Report under the tools or maintenance menu. You may also select an Inkjet411 test print by clicking the button below. A sample Print Quality Report is shown below (exhibits a minor black print microbanding defect). For print quality issue recovery steps, click here
3) Check Printhead Cleanliness & Connectivity
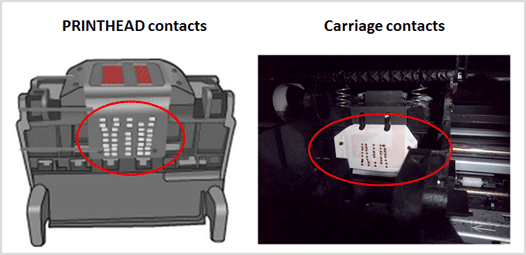
a) If your printer model is equipped with a removable PRINTHEAD assembly (see User Guide), then it is suggested to remove printhead and clean printhead electrical contacts.

b) Use the damp cloth (de-ionized water or isopropyl alcohol) to wipe the electrical contacts from the bottom to the top. Coffee filters and glass-cleaning cloths work well. Do not go past the edge between the electrical contacts and the ink nozzles. Repeat this motion until no ink remains on the electrical contacts.
c) Reinstall printhead assembly (lower latch to secure assembly), reinstall ink cartridges.
NOTE: Carefully lower the latch handle before reinserting the cartridges. Leaving the latch handle raised can result in incorrectly seated cartridges and printing issues. The latch must remain down to install the cartridges correctly.
d) Re-test print performance to determine if print quality problem has been resolved.
e) If the problem continues with either new or refilled ink cartridges then the electronic printhead assembly may need to be replaced.
4) Perform Warm Water Flush on Printhead (i.e. for printers 1 year and older)
a) If the printer continues to exhibit severe print quality performance and/or multiple colors are missing following the repeated activation of the ‘Clean Printhead’ / ‘Deep Cleaning’ feature, then you may need to perform a Hot Water PRINTHEAD flush to help fully recover the printer’s ink system*
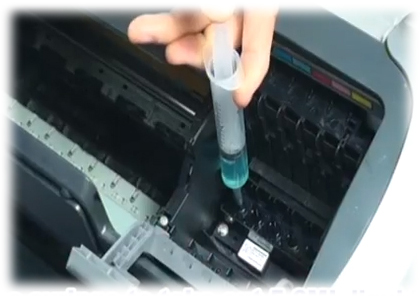
b) If the PRINTHEAD is not customer removable (per step a. above), then it is suggested you take a damp cloth and repeatedly blot/saturate the respective PRINTHEAD color ink port with water (distilled water is recommended)**
- Remove all ink cartridges from printer.
- Place a paper towel under the PRINTHEAD/Carriage assembly.
- You’ll see a round mesh ink ports where ink flows into the PRINTHEAD.
- Thoroughly dampen the ink port with 0.5 to 1 teaspoon (or 5 to 10 milliliters) of distilled water (use an eye-dropper or syringe).
- Remove towel from below PRINTHEAD/Carriage assembly.
- Reinstall ink cartridge(s).
- Activate the ‘Clean Printhead’ routine once or twice to see if the respective color(s) have recovered.
c) If print quality does not improve, and all steps from HP and/or above have been performed, then click here for additional recovery suggestions.
Advanced HP Printer Diagnostics
To view advanced diagnostics tests for your HP printer, click here:
Printhead Life
The replaceable or non-replaceable PRINTHEAD will eventually fail over time with usage and age. Check User Manual to determine if your printer’s Printhead can be removed/replaced.
To learn more about Printhead Function & Failure conditions, please select your printer model:
HP OfficeJet Pro 6230 Printer, HP OfficeJet Pro 6830 Printer, HP OfficeJet Pro 6835 Printer, HP OfficeJet 6812 eAIO Printer, HP OfficeJet 6815 eAIO Printer, HP OfficeJet 6820 e-All-in-One Printer, HP OfficeJet 6810 e-All-in-One Printer
NOTE 1: The electronic semi-permanent printhead, which is responsible for pulling ink from the ink cartridges and firing ink drops onto the page, may eventually fail in time. This is primarily based on a combination of total printed pages (rated duty cycle) vs. image content and printing frequency. Dry firing, where one particular color is not printing, can significantly increase the chances of a permanent printhead failure.
*Printhead flushing procedure applies to the following HP printer models (select your printer model):
HP Officejet Pro 6230 ePrinter, HP Officejet Pro 6830 e-All-in-One Printer, HP Officejet Pro 6835 e-All-in-One Printer, HP Officejet 6812 e-All-in-One Printer, HP Officejet 6815 e-All-in-One Printer
NOTE 2: A compatible/clone ink cartridge can be problematic; the smart chip (at base of cartridge) may not provide reliable printer-cartridge connectivity once installed. Compatible cartridges are typically purchased on-line from overseas (i.e sold under a different label than the regular HP cartridge packaging) and is essentially a “remanufactured tank” of the HP original/genuine ink cartridge. For the best refilling experience, only use HP original/genuine ink tanks (to confirm, look for HP trademark logo on side/top label of ink cartridge); most refillers will NOT refill clone/compatible ink cartridges.


