


HP 564 (564XL) Ink Cartridge Series Printer Models
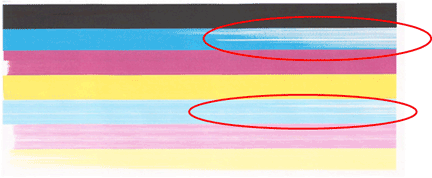
Degraded Image Quality or Missing Colors
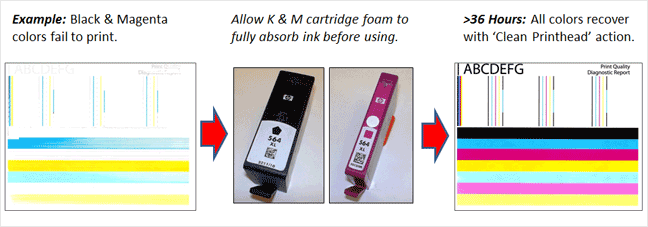
Many of the HP printer models which use HP 564 and HP 564XL ink cartridges may experience poor image quality and/or ‘color cross-contamination’ at some point during the printer’s life.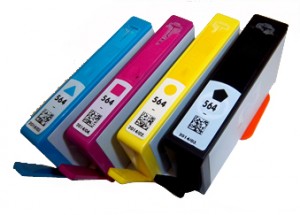
It is suggested to first initiate the ‘Clean Printhead’ feature (under the TOOLS/MAINTENANCE menu) to ensure air is not trapped in the newly refilled ink cartridge or printhead. The ‘Clean Printhead’ feature can also help clear a clogged printhead.

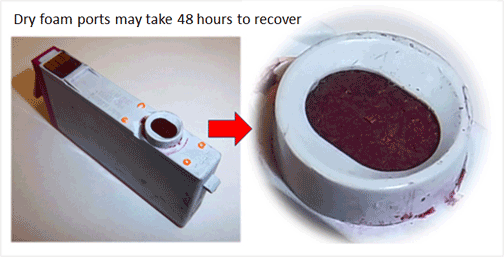
Allow 24-48 hours for foam to fully absorb ink
If, following several attempted ‘Clean Printhead’ actions, select colors do not recover, then allow the newly refilled cartridge sit upright and idle in the printer (or with storage caps installed if cartridges are not yet installed), for at least 36 hours (i.e. do not use printer during this time). Quite often HP564 ink cartridges which have been allowed to dry out (or select colors were allowed to run completely empty during normal printing usage) will be problematic immediately following ink refilling – you will need to allow cartridge foam (ink port at base of suspect ink cartridge) to fully absorb the ink – unfortunately this typically takes 24 – 48 hours.
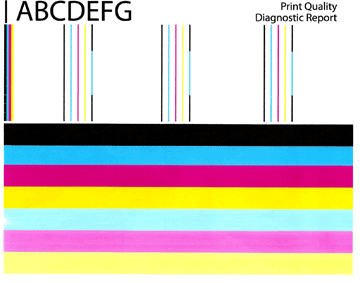
To verify all colors are firing properly, print a Self Test page or Print Quality Report under the tools or maintenance menu. You may also select an Inkjet411 test print by clicking the button below:
A normal looking Print Quality Report (i.e. internal printer test) is pictured below:
If this does not correct the cross-contamination (or smearing of ink) then the issue can also be corrected by cleaning the service station (capping station/parking pad) wipers of all ink residue and build-up. You may also wish to consider cleaning the printhead’s rear electrical contacts and the carriage assemblies electrical contact area of any ink residue (steps 4-9). Refer to User Manual for complete instructions; the following procedures are provided for general guidance only.
1) Open top cover/cartridge cover to printer – carriage should move away from service station/capping station.
2) Removing the cartridges from the carriage.
3) At service station area (either left or right side of printer bay), using a damp towel, gently wipe the front and back edges of each wiper blade – remove all ink residue & build-up.
CAUTION: Wipers are delicate and can be broken easily if pushed with too much resistance.

4) Remove printhead assembly by pulling up on lever at right side of carriage (if Printhead is removable – check your User Manual).

5) Using an isopropyl alcohol dampened lint-free cloth or towel, thoroughly the clean the printhead’s rear electrical contacts area by gently wiping (DO NOT TOUCH NOZZLE PLATE AREA). Repeat until no ink residue remains. NOTE: Coffee filters and glass-cleaning cloths work well. Ensure three key areas are thoroughly clean – refer to picture below.

6) Using the same cleaning materials in step 5, clean electrical contacts on carriage chassis – remove all ink residues.

7) Reinstall printhead assembly (lower latch to secure assembly), reinstall ink cartridges.
NOTE: Carefully lower the latch handle before reinserting the cartridges. Leaving the latch handle raised can result in incorrectly seated cartridges and printing issues. The latch must remain down to install the cartridges correctly.
8) Re-test print performance to determine if print quality problem has been resolved.
9) If the problem continues with either new or refilled ink cartridges then the electronic printhead assembly may need to be replaced.
Severe Print Quality Issues / Missing Colors / Fade
A. If the printer continues to exhibit severe print quality performance and/or multiple colors are missing following the repeated activation of the ‘Clean Printhead’ / ‘Deep Cleaning’ feature, then you may need to perform a Hot Water PRINTHEAD flush to help fully recover the printer’s ink system*
Hot Water Printhead Flush
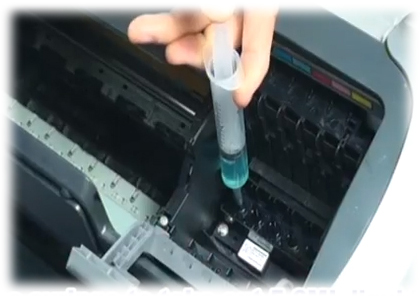
B. If the PRINTHEAD is not customer removable (per step A. above), then it is suggested you take a damp cloth and repeatedly blot/saturate the respective PRINTHEAD color ink port with water (distilled water is recommended)**
- Remove all ink cartridges from printer.
- Place a paper towel under the PRINTHEAD/Carriage assembly.
- You’ll see a round mesh ink ports where ink flows into the PRINTHEAD.
- Thoroughly dampen the ink port with 0.5 to 1 teaspoon (or 5 to 10 milliliters) of distilled water (use an eye-dropper or syringe).
- Remove towel from below PRINTHEAD/Carriage assembly.
- Reinstall ink cartridge(s).
- Activate the ‘Clean Printhead’ routine once or twice to see if the respective color(s) have recovered.
If print quality does not improve, and all steps from HP and/or above have been performed, then click here for additional recovery suggestions.
Advanced HP Printer Diagnostics
To view advanced diagnostics tests for your HP printer, click here:
Printhead Life
The replaceable or non-replaceable PRINTHEAD will eventually fail over time with usage and age. Check User Manual to determine if your printer’s Printhead can be removed/replaced.
NOTE: The electronic semi-permanent printhead, which is responsible for pulling ink from the ink cartridges and firing ink drops onto the page, may eventually fail in time. This is primarily based on a combination of total printed pages (rated duty cycle) vs. image content and printing frequency. Dry firing, where one particular color is not printing, can significantly increase the chances of a permanent printhead failure.
*Printhead flushing procedure applies to the following HP printer models: HP PhotoSmart B209a, PhotoSmart B8500, PhotoSmart B8550, PhotoSmart B8553, PhotoSmart B8558, PhotoSmart C309, PhotoSmart C309a, PhotoSmart C309g, PhotoSmart C310, PhotoSmart C510, PhotoSmart C510a, PhotoSmart C5300, PhotoSmart C5324, PhotoSmart C5370, PhotoSmart C5373, PhotoSmart C5380, PhotoSmart C5383, PhotoSmart C5388, PhotoSmart C5390, PhotoSmart C5393, PhotoSmart C6300, PhotoSmart C6324, PhotoSmart C6340, PhotoSmart C6350, PhotoSmart C6375, PhotoSmart C6380, PhotoSmart C6383, PhotoSmart C6388, PhotoSmart D5400, PhotoSmart D5445, PhotoSmart D5460, PhotoSmart D5463, PhotoSmart D5468, PhotoSmart D7500, PhotoSmart D7560, PhotoSmart eStation All-in-One, PhotoSmart Plus All-in-One, PhotoSmart Plus e-All-in-One, PhotoSmart Plus e-All-in-One B210a, PhotoSmart Plus e-All-in-One B210b, PhotoSmart Plus e-All-in-One B210c, PhotoSmart Plus e-All-in-One B210e, PhotoSmart Premium e-All-in-One, PhotoSmart Premium Fax, PhotoSmart Premium Fax All-in-One, PhotoSmart Premium Fax e-All-in-One – C410a, PhotoSmart Premium Fax e-All-in-One – C410b, PhotoSmart Premium Fax e-All-in-One – C410e, PhotoSmart TouchSmart Web All-in-One, PhotoSmart 7525
**Printhead flushing procedure applies to the following HP printer models: HP DeskJet 3520, 3521, 3522, OfficeJet 4620 series


